I am delighted to have JoAnna from re-U post a great DIY project for me today. Like me, she is all about re-purposing and re-using to save the planet and some cash. I love this chevron rug that she created, and below she gives us instructions on how to get this fabulous trendy look on the cheap. She used a $19.99 natural-weave rug from Pier 1.
Here we go:
- The first step requires a bit of math. We wanted approximately 5 inches between each line so we divided 5 into the length of the rug. The whole number told us how many lines would fit and the remainder was divided by that number and that fraction added to 5 so that it would come out evenly. Example 64/5=12 and 4/5ths. Or, 12 lines with 4/5ths of an inch left over. 4/5 divided by 12 is about 1/16th of an inch. Then we put straight pins ever 5 1/16 inch on both sides. Place the pins sharp ends toward the center.
- Repeat the process for the width. Divide the width by an even number and place your pins. We divided by eight.

- Next tie your thread to any pin closest to a corner and cross over the rug and around the next pin moving away from the corner then back across the rug. Continue in this manner until you reach the other edge. Bring your thread to the first pin on the adjacent edge and work your way across until the entire rug is divided into equal rectangles.

- Taping can be a little tricky to start, but gets easier once the first one is done. Place the first piece of tape beginning on your left with the side of the tape closest to you starting at the corner and crossing the first set of intersecting threads. It should cover the thread that is coming from the left and the thread that is coming from the top, but leave the thread coming from the bottom and the thread coming from the right exposed. Tear tape. Place the next piece with the edge closest to you beginning at the intersection where you just left off with the last piece. It will cover the top and right threads leaving only the one from the bottom exposed and end to the right of the next pin. The next piece begins left of the same pin where you left off and ends left of next intersection. Continue until you reach the other side. It’s a little tricky but trust me it gets easier as you go!

- Using the edge of the intersecting piece of tape as a guide, cut off raw edges of tape to form points everywhere two pieces of tape meet.
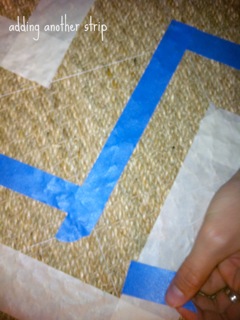
- At this point we decided to add a piece of thinner tape between each set of wide one to add interest. We were able to eye-ball this line using the wide tape for our guide.
- Once the taping is complete press down tape securely.

- Using an almost dry brush we applied a thin coat of paint allowing some of the grass to show through and maintaining the rough texture of the rug.


Great job JoAnna! It turned out so well, and I love the colour. Thanks for sharing your tips.
Check out JoAnna's blog over at re-U.


No comments :
Post a Comment
I'd love to hear from you. Thanks for making my day!